Chocolate Therapy

I don’t know if I’ve mentioned it before, but chocolate is my favorite thing. Not only do I love it, but I deeply believe in its ability to alter/better my mood (think Harry Potter and the cure for dementors). In fact, a friend of mine said the other day, after making delicious lemon bars, that when she was a child, she didn’t understand the point of desserts without chocolate. And I said, “and what is the point?” because in general, I still feel that way (though the lemon bars were amazing).

This week, the moms who lunch are celebrating two birthdays, one mom birthday and one baby birthday (I can’t believe we are getting to the point where our babies are turning one?!?! Can time stop PLEASE!).  In honor of both birthdays I decided to bring back to life a recipe I made a long time ago. It was the first major baking (though the oven is not involved) project I did as an adult. It was in an old apartment, long before baby, though not before marriage. It took me all day. And it was worth it. I thought it would be interesting to see, now that I am so experienced in all things baking and cooking (I kid), if it was easier to make now.

Did I mention that said recipe is a Chocolate Cream Pie?!?!?! The main lessons I have learned since I last made this recipe are:

-Read the recipe multiple times before you start and before you go shopping. Attention to detail and not having to check the recipe mid-stir can help immensely.

-Time management in general. I felt much less panicked about how the custard would turn out, how long it would take to cook, etc. Things I account to feeling more prepared and better able to get the ingredients ready ahead of time, which is a big part of time management in my opinion.

This is a wonderful recipe. It is from Saveur magazine (I know I know, I owe you a post about how much I love them). You can find it here. It is a great recipe because it is actually not that hard, especially if you already feel comfortable making custards, and it has such a rich chocolate flavor without being too sweet.

A few notes about the recipe. You will be tempted to skip the sieving step, don’t! It is what makes the custard super velvety and smooth. Also, be sure you follow the amounts in the instructions and not just in the ingredients list. For example, it calls for 16 tablespoons of butter, but half are for the crust and half are for the custard. Same with the sugar and the vanilla. Basically, pay attention and read the recipe a few times (I mentioned that already, didn’t I?). Finally, here is my major shortcut: I don’t make the crust! I buy oreo crust from the grocery store. It was so yummy last time, I’m assuming it doesn’t make that much of a difference. I know, such a cheater. But come on, there is an 11 month old running around. Who has time to make crust?!?!

Enjoy!

The yolks, sugar, and cornstarch. Wow, that is yellow.

The chocolate custard before going into the fridge. Note the open window! It was that warm!

Look at all that whipped cream!

Fancy chocolate shavings

The final product: Messy and delicious

Best Cookbook EVER

Just a quick note. Our little one is 10 months old today! I can’t believe how quickly it has gone by.

Now to cookbooks. As you may or may not have already figured out, we cook vegetarian and I love the Moosewood cookbooks. However, I have begun paying attention to which Moosewood cookbooks are Mollie Katzen books and which are post-Mollie Katzen (AMK-After Mollie Katzen).

I love her. I love her illustrations. I love her playfulness. I love the commentary on every recipe. She is an inspiration. However, her recipes are often intense, meaning: Many ingredients (most of which we don’t have around the house), lots of chopping, lots of pans and lots of time. So I’m often daunted by her cookbooks. Granted, some of our favorite go to recipes come from her books, both her Moosewood books and post-Moosewood books (Gypsy Soup, Cauliflower Puff, Indonesian Rice Salad) but they take work. And did I mention we have a baby? So yeah, lots of work is not so great right now.

This is where the Moosewood cookbooks AMK come in. The two books we have make all the recipes so easy. Simple Suppers and New Classics are two of my favorite cookbooks. Simple Suppers is great because they define simple in so many ways. Sometimes it means quick; sometimes it means only one pot; sometimes very few ingredients. But whatever it is, the recipes are delicious.

So I recently started exploring Moosewood Restaurant New Classics. It is wonderful. There are a few duds but some of my new favorite recipes are from this book. I will share two of them below. I have already made both of these recipes three times each! The only thing that is lacking from these Moosewood books AMK is a little bit of that character and personality I love so much about Mollie Katzen’s writing. But did I mention the delicious factor?

Enjoy!

Instant Tamale Pie

Preheat oven to 350. Lightly oil an 11-inch casserole dish.

Mash a can of pinto (or black) beans WITH their juice in a large bowl. Add and mix ½ cup of corn, ½ cup of salsa, 1 tsp cumin, ½ tsp oregano, and ¼ tsp salt.

Buy a role of pre-made polenta. The recipe says to use 12 ounces of it, but they come in 18 ounce tubes, so I just use it all. Cut it into ¼ inch thick rounds and layer them on the bottom of your casserole dish, slightly overlapping. Spoon the bean mixture over the polenta.

Sprinkle on 2-3 tablespoons of chopped cilantro on top. Then add 1 cup of grated Cheddar cheese on top of that.

Cover and bake for 15 minutes and then uncover and bake for another 15 minutes, until the beans are bubbling and cheese is browning. Let sit for 10 minutes before serving.

Devour!

Presto! Chocolate Cake

This cake is amazing and so super easy. And you probably have all the ingredients in your kitchen already.

Preheat oven to 350. Grease an 8 or 9 inch square pan. Or make it in a bundt pan, like I did, but make sure you grease really well!

In a large bowl mix 1 cup flour, 1/3 cup unsweetened cocoa, ½ tsp baking soda, and ¼ tsp salt.

In your kitchen aid or with an electric mixer combine ½ cup of butter with 1 cup of sugar. When the butter and sugar are combined, add 2 eggs, one at a time, until incorporated.

In a small bowl combine ¾ cup of water with 1 tsp vanilla. Add the flavored water by thirds to the creamed mixture, alternating with the flour mixture and beating after each addition.

Poor into the pan and bake until a knife inserted into the center comes out clean, 30-35 minutes.

When the cake is almost done, make the glaze. It’s so easy! ½ cup of chocolate chips, 1/3 cup of jam (apricot is a nice choice), and 2 tablespoons of milk. Put in a small pan and warm on low heat, stirring constantly until melted.

When the cake is done, pour hot glaze on top (if using a bundt pan, flip out of pan to make right side up on a plate before pouring the glaze on).

Serve warm or at room temperature. Yum yum and yum!

20120217-225157.jpg

I Love Cardamom

I love cardamom. I made the Cardamom Coffee Cake muffins last week (see my blog from last week) and then came across a recipe in Bon Appetite for Cardamom Crescents. I have also tried to make Cardamom bread from Saveur twice, once a disaster, once a success. So I thought I would have a day of Cardamom making (and throw some potato chowder into the slow cooker).

But first, why do I love cardamom so much. First, its amazing and delicious. But its also nostalgic. When I was in progressive hippy school back in the day, we went on many overnight trips. In 5th grade I distinctly remember going on a trip to one of my classmates’ beach house in Santa Cruz. The teacher made chai. I don’t know how related to actual traditional chai it was, but it was made with lots of whole milk, sugar, and spices. I think it was the first time I had a sweet warm drink that wasn’t hot chocolate. I remember the smell of the tea, and when I smell cardamom I am taken back to that time. I think it rained the whole time we were there, in typical California fashion, and that smell is comforting and cozy for me. When I smell cardamom, I want to curl up in a warm bathrobe, drink tea, and eat something with that smell. And I have recently discovered some wonderful options. They all go well with tea, too.

Cardamom Crescents

Cardamom Crescent Recipe.

If I were to make these again I would pay closer attention to how I shape the cookies. I thought they would flatten out more when in the oven. But once I dusted them with the second round of powdered sugar, they looked pretty. And they taste SO good. Like I bought them at a bakery or something.

Braided Cardamom Bread

Cardamom Bread Recipe.

When I decided to embrace domesticity I decided I wanted to learn how to make bread. This is one of the first ones that I tried, and oh boy was it discouraging. The first time I made this bread I followed the recipe and it didn’t all fit in the Kitchen Aid bowl! I sort of mixed it and let it sit there (it looked like brains) and of course it didn’t rise. So the next time I made it I split all the ingredients in half. It worked better that time. Still, a challenging bread to make. I was hoping this time, with more baking and bread making experience under my belt, it would go better. And it was almost a success. I had the right amount of everything (split the egg by using one whole egg and one egg white).. the dough looked good, rose well, and I braided it beautifully.

I took it out of the oven after 25 minutes and it looked like this. Okay, I need to work on my egg wash and making it even but looks good and baked, right?

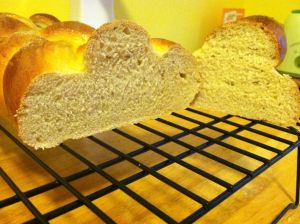
Then I cut the end and tasted it after it cooled down and it looked like this. And it tasted delicious.

Perfect right? Then I cut it in the middle, and it was doughy! I hadn’t cooked it enough. So my wife picked through it when she got home and we ate the leftovers.

So sad. Next time I’m going to cook it on lower heat and for a little longer. Overall the day of cardamom cooking was fun and definitely a learning experience. These are both great recipes if you want to try them.

-Rachel

Broth, Brussels, and Baking

Warning: This post is recipe heavy. But don’t worry, there are lots of pictures.

Broth

So I have always wanted to cook with my own vegetable broth, I have just never had the time/energy to make my own. But when I made soup the other day (http://wp.me/p1Y51C-U) it occurred to me that it would be much better with homemade vegetable broth. The slow cooker makes it so easy to make broth. I turned it on before bed and when I woke up there was my broth. All I had to do was strain it. Easy as pie!

Picture of the vegetable broth before bed.

Brussels

We are saving most of the broth to make the Potato Leek soup again, but here is the first thing we (and by we I mean my lovely wife) made with it. This recipe is adapted from the Saveur magazine website (more on how much I love Saveur later). It is always interesting to make things vegetarian, especially when the recipe calls for far rendering

20111111-204423.jpg

Penne with Brussels Sprouts, Cranberries, and Caramelized Onion:

2 tbls olive oil

3 oz. of morningstar bacon, cut into 1/2 inch pieces

2 cups Brussels sprouts, trimmed and halved

1 medium onion, sliced

1/4 dry white cooking wine (the original recipe called for vermouth, but unless you already have it sitting around, you can just use white wine)

1 cup vegetable broth (made at home in the slow cooker!)

1/2 cup dried cranberries (we ran out and used some raisins in addition to the cranberries, delicious)

6 oz. of penne (original recipe called for fettuccine, but it was great with penne)

2 oz. Parmesan cheese, grated

Salt and pepper to taste

1. Heat 1 tbls of the oil in a large heavy bottom skillet (we used our beautiful orange dutch oven). Add the bacon and cook until crispy. Set bacon aside.

2. Add the other tbls of oil turn the heat to medium-high. Put the Brussels sprouts in, cut-side down and cook until they are brown. Then add the onion and toss to combine. Cook, stirring occasionally, until the onions are translucent. Add the broth, wine, and cranberries and bring to a fast simmer. Cover, reduce heat to medium, and cook until the sprouts are soft.

3. Meanwhile, cook the pasta until al dente and reserve 1/4 cup of the cooking water. Transfer the pasta to the skillet and toss continuously over medium-high heat for 1-2 minutes or until most of the liquid is absorbed (if its too dry, that is what the reserved cooking water is for.) Season with salt and pepper and serve with the Parmesan and bacon on top. Delicious

Baking

We have been feeding the baby greek yogurt, but clearly she eats it slowly so I figured I had to do something with the leftover yogurt. I went to my trusty Moosewood cookbook and found a ridiculous recipe for Cardamom Coffee Cake. However, it is supposed to be made in a budnt pan, which we don’t have. So I thought I would cut the recipe in half and try to make muffins. A great success.

Here is the recipe as I made it: Cardamom Coffee Cake Muffins (makes 12)

2 sticks of butter (OMG so much butter, delicious!)

1 cup packed brown sugar

2 eggs

1 tsp vanilla extract

2 cups flour

1 tsp baking powder

1 1/4 tsp baking soda

1/4 tsp salt

1 1/2 tsp powdered cardamom

1 cup yogurt (she says you can also use sour cream or buttermilk)

Nut mixture:

1/8 cup of brown sugar (I eyeballed it in a 1/4 cup measuring cup, cause who has a 1/8 measuring cup?)

1 1/5 tsp cinnamon

1/4 cup chopped walnuts

1. Preheat oven to 350 and fill muffin tin with paper liners.

2. In a large mixing bowl (I used the Kitchen Aid) beat the butter and sugar until light and fluffy. Add eggs, one at a time, beating well after each. Then add the vanilla.

3. In a separate bowl, mix together dry ingredients (not including the nut mixture).

4. Add the flour mixture, 1/3 of it at a time, alternating with the yogurt. Stir just enough to blend after each addition. Do not overmix. At this point I stopped using the Kitchen Aid, took the bowl off the stand, and mixed with a wooden spoon.

5. Combine the nut mixture. I used the magic bullet!

6. In the muffin tin, fill each tin half full with the batter, then a layer of the nut mixture, then the rest of the batter on top. They will be full to the brim. Spread flat (as best you can).

7. Bake for 30 minutes. Make sure a knife comes out completely clean to check if they are done. Let cool.

In the muffin tin and out. See the layer of the nut mixture? Yummy!

Also, just a note. If you happen to make chocolate cookies, and you have leftovers, and you happen to have some mint chocolate chip ice cream in the fridge, and your wife is a genius, you should make these:


To knead or not to knead

So we still had leftover buttermilk so I wanted to try buttermilk bread again. Instead of going to a cookbook I did a search online and came across this recipe from someone’s blog:

http://seddy5.typepad.com/blog/2010/11/oatmeal-buttermilk-bread.html

I love all the pictures and I love the constant reassurance that it is okay that the dough is sticky. This was so helpful to me (my major bread problem is adding flour and adding flour and then adding too much flour… teehee.) The first rise took a long time. I think our house is too cold for bread to rise, so I turned the oven on to warm up the kitchen.

The baking was a little funny, as the first loaf got brown on top before it was done on the bottom. So with the second loaf, I switched it to the bottom rack earlier than I had with the first loaf. It got a little burned on the bottom, but I think will be baked better throughout.

Here is the final result:

The bread is delicious. A little sweet and hearty. I had a PB & J on it last night. Amazing.

Now today’s topic of discussion: Using a Kitchen Aid to knead bread. Two things, it feels like cheating and the bowl never feels big enough. On point number one, there is something so romantic and domestic and I-feel-like-my-grandma-y about the idea of truly deeply kneading a loaf of bread. And with the right kind of dough (not today’s sticky mess) it can feel very satisfying. I love the feel of the dough when it gets smooth, the ache in your arms, and the way the dough changes. However, it is exhausting and so much work and takes a long time, which I don’t have if the baby is getting fussy. The kitchen mixer is just SO much easier. I love that I can just leave it while it does all the work and magic, there is your dough. However, for many recipes, I feel like our bowl isn’t big enough. The dough constantly seems to be pouring over the sides. Today, it ended up working out, but other times I have had to take out half the dough and do part of the kneading by hand or take turns in the mixer. Frustrating. I liked today’s recipe because it told me specifically how to do the kneading in the mixer.

Other kitchen adventures in the past few days:

4 dozen chocolate chip cookies (I love the recipe on the nestle tollhouse bag).

Tuscan white beans with sage and garlic (from the Gourmet Vegetarian Slow Cooker). Here they are before I turned on the slow cooker. Delicious.

Whole Wheat Buttermilk Bread or my struggles with Laurel’s Kitchen

Good morning,

Know that this post is being written on little-no sleep (for some reason the babe was up almost every hour last night, uggg)… but I wanted to write this while the experience was fresh.

I made a buttermilk bread recipe yesterday from Laurel’s Kitchen.  Laurel’s Kitchen was one of those cookbooks (along with many Moosewood cookbooks) that was always on my mother’s shelf. In retrospect, I’m not sure what she made from it, but because I remember seeing it there forever, I made sure to have it in our collection. However, it is a challenging cookbook, largely because it involves lots of reading. She does not just write recipes, she is trying to teach you how to really KNOW how to make bread, not just follow a recipe. In theory, I love this idea, but I also find it incredibly frustrating at times. Enter last night’s bread making.

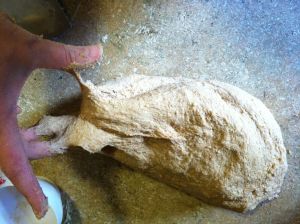
So most of her recipes call for whole wheat BREAD flour, which I can never (or am too lazy) to find. So I end up working with regular whole wheat flour. This recipe looked promising (I made bread from there before and it was a little dry, to say the least). 3.5 cups of liquid to 5.5 cups of flour, some honey, some butter, my yeast looked good and foamy. Mix in a bowl and throw onto the counter. All seems promising. But the dough was SO sticky.

See how it is sticking to my hand? So like I do, I started adding flour while kneading. Kneading is exhausting and after 20 minutes it was less sticky and I was feeling done so I left it to rise, figuring it was much to heavy to rise.

While rising, I browse through Laurel’s pages and pages of bread making instructions and see that breads with milk (mine had buttermilk) tend to be more sticky. Thanks for letting me know! Too little too late.

So the first and second rise goes well. The proofing, not so much. I have learned that I need to take more care in forming my loaves or this happens:

Yeah, it kinda looks like two loaves on top of each other. But the results were not bad, if you like whole wheat bread, which I am now not sure I do.

We had it as a pre-bed snack with jam and butter while watching a banjo documentary. Pretty yummy.

Lessons:

I don’t like to knead as much as I think I do and should always start bread in the mixer

Stop making whole wheat bread, its just not as good (or find a recommended recipe?)

Shape your loaves with care, otherwise they look WEIRD

And last, but not least, if you are going to make something from Laurel’s Kitchen, read all pages involved in any given recipe. Yes, it can be annoying, but you will learn a lot and your recipe will turn out better

-Rachel

Breakfast Bread Pudding

Ok, while the baby is having some happy tummy time, I will post about the much requested Breakfast Bread Pudding. But first, why do I love my slow cooker?

It often involves that one dish, and no other dishes, which is amazing for someone like me who hates to do dishes.

The recipes are interesting and involve flavor that develops over a long period of time.

I can leave it on while the baby and I go for long walks, do errands, or meet fabulous people for lunch.

Its just fun!

This is from a cookbook called The Vegetarian Slow Cooker.

Start by lightly greasing your slow cooker. I just used cooking spray, but a lot of it, and make sure you get up the sides.

First you cube 4.5 cups of French Bread, which is not a whole loaf as I somehow imagined it would be. Its more like 3-4 large slices. Set that aside.

Then peel and chop 3 large apples, I used Macoun, but the recipe called for cooking apples, and a heartier apple probably would’ve been better, since my apples were pretty mushy, though maybe they were meant to be that way.

Combine the apples with:
1 tsp cinnamon
1/2 tsp all spice
1/4 cup packed brown sugar
2 cups milk (I used leftover whole milk, yum!)
1/4 cup maple syrup

Set that aside.

Then you have to cook 12 ounces of soy sausage. I just used a whole role (14 ounces). This is the most annoying part because it involves a pan and because that stuff is so hard to break up and brown.

Once all your components are ready you layer it like this:
half the bread
then half the apple/milk mixture, pressing down the bread to make sure it gets soaked
half the sausage
the rest of the bread
the rest of the sausage
the rest of the apple/milk mixture.

Then you cover and cook on low for 6 hours. My slow cooker finishes everything 30 minutes-hour early. So I turned it on at 12:40am and turned it off around 6:15am and it was perfect, any longer and the sides would’ve started to burn.

The only other thing about this recipe is that when you take a bite, you have to make sure you have some of each component otherwise it is too sweet or too savory, i.e. my first bite had too much sausage and it was overwhelming.

Let me know how if you make it and how it goes.

Okay, off to heat up some leftover Breakfast Bread Pudding and get the baby dressed for the day (we slept till 9am, after waking up every few hours since 2am). We are attempting a trip to Occupy Boston today. Hopefully we will make it and I can post about it, with pictures!